Overview
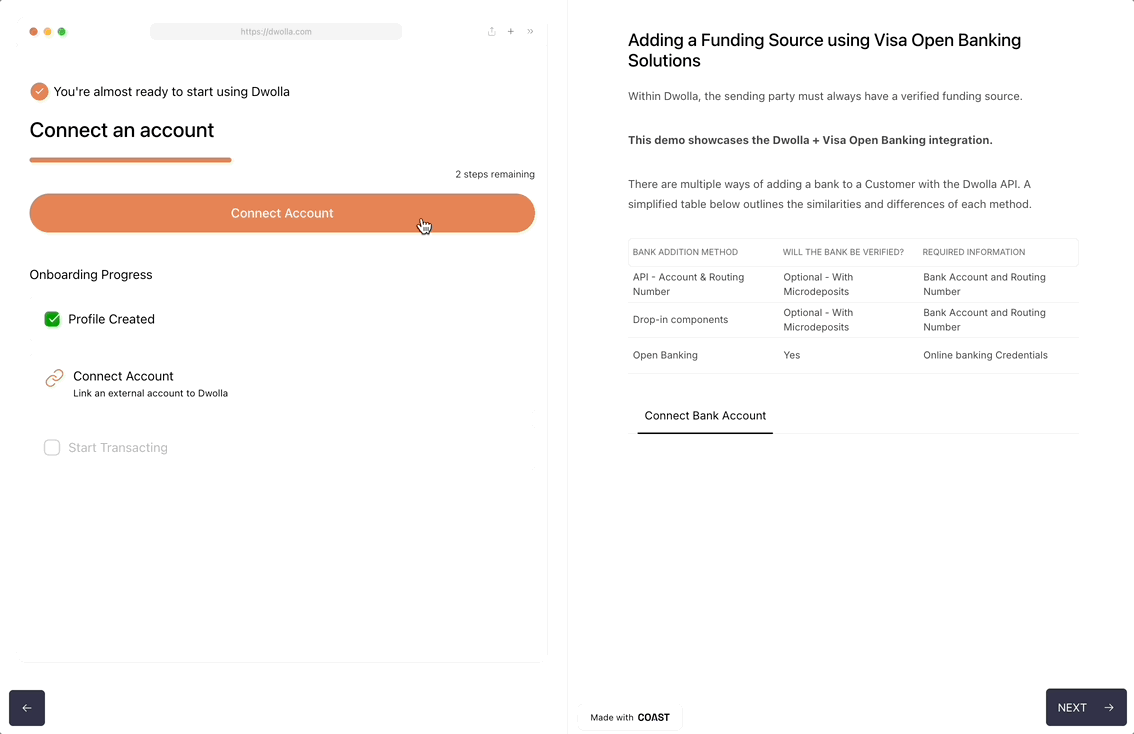
This guide dives into leveraging Dwolla’s Open Banking Services in collaboration with Visa, a world leader in digital payments, to streamline bank account verification within your Dwolla-powered application. Open banking empowers your users to more securely share their financial data with Dwolla and your application, eliminating the need for manual entry and improving the overall user experience. We’ll walk you through the steps to set up and integrate Visa Instant Account Verification (Visa IAV) using Dwolla’s Exchange Sessions API. Dwolla’s powerful Exchange Sessions API acts as the bridge between your application and Visa Open Banking Solutions. This established connection facilitates real-time verification of your user’s bank account details. To gain hands-on experience, we recommend following along with the provided integration-examples sample app, which provides a practical understanding of the integration process for your own application. Instant Account Verification (IAV) is a one-time process that verifies the account being added by an end user is open and active. At the end of this guide, you’ll obtain a Funding Source URL, which is a unique identifier that represents a bank account being used for account-to-account payments.Prerequisites
Before starting the integration, make sure you have taken the following steps:- Set up a Dwolla Production account, or a Dwolla Sandbox account if you’re still developing or testing your application.
- Before creating a funding source, your application will need to create a Customer. If you have not created a Customer yet, check out our Create a Customer API documentation.
- Ensure you have a redirect URL registered with Dwolla. This is where the user lands after completing the IAV flow.
Contact Sales to set up a redirect URL for the Visa IAV flow. Verify your API keys have the required permissions.
Sandbox Testing
Testing within the sandbox environment is an essential step before deploying the Visa IAV solution to a production environment. The sandbox acts as a safe, isolated testing ground that mirrors real-world scenarios with test data. This allows you to validate the functionality of your integration without using actual user accounts or financial information. By thoroughly testing in the sandbox, you can identify and correct any potential issues before they impact your live users.Demo Bank Test Credentials
When an end-user opens the Exchange Session URL, they are prompted to authenticate with their bank and choose a bank account to link. When testing Visa IAV in the sandbox environment, you can use the following test credentials for the Demo Bank to simulate different scenarios.| User | Username | Password | Description | Result |
|---|---|---|---|---|
| User 1 | u51613239 | cty440 | User has successfully authenticated but no account information could be found | ✅ Successful |
| User 2 | u35490150 | ckr403 | Report with full information | ✅ Successful |
| User 3 | u92721594 | nbs589 | User failed to authenticate themselves at the financial institution | ❌ Authentication error |
| User 4 | u91902655 | jtx720 | Temporary error with a Visa service | ❌ Temporary error |
Dwolla Node SDK for API Interactions
Throughout this guide, we’ll assume you’re using the Dwolla Node SDK to interact with Dwolla’s API endpoints. This SDK simplifies making requests and handling responses for various Dwolla functionalities.While we are using Dwolla’s Node SDK for the sake of demonstration in this guide, Dwolla also offers additional libraries for other server-side programming languages.
Demo
Visa Open Banking Demo
Coast Demo: Visa Open Banking Flow
Steps to Integrate
Step 1 - Initiate Exchange Session
Use Dwolla’s API endpoint to create an exchange session to initiate an Exchange Session for a Customer. Specify Visa as the desired open banking provider within the request body. The Exchange Partner ID for Visa can be found by calling the List Exchange Partners API endpoint.Redirect URL Validation
When using Visa as the exchange partner for an exchange session, a redirect URL is required. This URL specifies where the user will be redirected after completing the authorization process with Visa. Dwolla will validate the provided redirect URL against the one previously configured for your application.Guidelines:
- Ensure your configured redirect URL with Dwolla exactly matches the one you include in the request body (including protocol, domain, port, and path).
- Use HTTPS for your redirect URL to enhance security.
- Consider whitelisting your redirect URL to restrict redirects to specific domains.
Example using Dwolla Node SDK
Step 2 - Retrieve Exchange Session and Complete Tink/Visa Link Flow
In this step, you’ll retrieve the exchange session details, including the Exchange Session URL. This URL is used to initiate the Visa Link flow within your application. Use the exchange session ID obtained in Step 1 to call Dwolla’s Retrieve an Exchange Session endpoint. During this flow, the user interacts with Visa’s interface to authorize their bank account information to be shared.Example using Dwolla Node SDK
Redirect User - Next.js Example
Step 3 - Handle User Redirect
After completing the Visa IAV flow, Visa redirects the user back to your registered URL. This redirect URL will include a query string parameter of “exchange” or an “error” depending on the outcome of the Visa IAV flow. You’ll need to implement logic to route the user based on if the flow completed successfully or if there was an error.Example Success and Error redirect URL
Parse the Redirect URL:
Upon receiving the user redirect, you need to capture the complete URL and extract relevant query parameters, such as the “exchange” parameter, which will contain information about the outcome of the IAV flow.Handle Successful Verification Example - Using Next.js
Handle Error - Example Using Next.js
Errors
The Visa Link flow may lead to a recoverable error or a non-recoverable error which can’t be resolved by the user. In such cases, it’s important to provide clear and actionable messages to the user, and/or return the user to the pre-verification step based on the error. The decision to present an error screen or return the user to the pre-verification step depends on the specific error and your application’s design. Here’s a general guideline: Recoverable Errors: These are issues that can potentially be resolved by the user. In such cases, it’s important to provide clear and actionable messages to the user. An error screen is often suitable for recoverable errors. This allows the user to review the specific message, make corrections and retry the IAV process.- Examples:
- Invalid Credentials: The user might have entered incorrect bank login credentials. The error message should prompt the user to double-check their information and try again.
- Temporary Network Issues: A temporary network glitch might interrupt the communication. The message could suggest the user retry after a short while.
- User Cancelled: The user decided to abandon the Visa IAV process. Your application should acknowledge this and allow them to resume if needed.
- Examples:
- System Errors: Internal system errors within Dwolla or Visa’s infrastructure may prevent successful verification. The message should apologize for the inconvenience and direct the user to contact your support team.
- Account Lockout: The user’s bank account might be locked due to security reasons. The message should explain this possibility and advise the user to contact their bank directly.
List of possible redirect errors
| Error Code | Description |
|---|---|
| AUTHENTICATION_ERROR | The error occurred during the authentication process with the bank. |
| USER_CANCELLED | The end user canceled the journey, either by going back or selecting the close button. |
| TEMPORARY_ERROR | A temporary error in Visa’s platform or a network issue. To resolve any of these errors, try again later. |
Step 4 - Funding Source Creation
After successfully creating the exchange, the next step is to create a funding source for the customer. This involves calling Dwolla’s Create a Funding Source endpoint, where you’ll provide the exchange resource obtained from the previous step. In the following function, once a response is received, it will extract the Location header value, which is the fully-qualified URL specifying the resource location of your funding source.Handling Re-authentication
When users initially connect their bank account via Instant Account Verification, they authenticate with their bank and grant permission to access their account information. This allows Dwolla to perform actions like checking bank balances. However, this access can be interrupted by changes on the bank’s end, such as a password update, multi-factor authentication reset, or revoked consent. To maintain a smooth user experience, your application needs to handle these scenarios gracefully. Dwolla’s API provides anUpdateCredentials error response to signal when a user’s bank connection needs to be refreshed.
UpdateCredentials error response
Steps to manage re-authentication
-
Detect the
UpdateCredentialserror: When making calls to Dwolla’s API (e.g., checking a bank balance), implement error handling to catch the UpdateCredentials response, which is an HTTP 400 error. - Communicate with your user: It’s crucial to inform the user why they need to re-authenticate and how to do so. Use clear and concise language in in-app messages, emails, or text messages to guide them back to your application to complete the process.
- Initiate the re-authentication flow: Upon receiving this error, redirect the user to re-authenticate their bank account. This is done by creating a new re-authentication exchange session. This will guide the user through the necessary steps to re-establish their bank connection.